GitHub Actions in Your JetBrains IDE
If you’re like most developers using GitHub Actions, your day probably looks something like this:
Push code → flip to the browser → open the Actions tab → click the right workflow → wait → scroll logs → flip back to the IDE → fix something → repeat.
It works… but it’s noisy, slow, and full of context switching. Your code is in JetBrains; your CI is in a browser tab. You’re constantly bouncing between them.
At some point I realized: why am I treating CI as a separate destination instead of something that lives right next to my code?
That question led me to build Actionate, a JetBrains plugin that brings GitHub Actions into your IDE. In this post I’ll walk through:
- Why this browser-based workflow is so costly
- What an “ideal” GitHub Actions + JetBrains workflow looks like
- How to set that up so you can see and manage CI without leaving your editor
The Hidden Cost of Switching Between IDE and CI
Let’s spell out the usual flow when you rely on the GitHub UI:
- You push a commit.
- You Cmd/Alt+Tab to your browser.
- You open the repo → Actions tab.
- You scan the list of runs, click the latest.
- You wait for jobs to start.
- If something fails, you scroll and expand the logs, maybe search a bit.
- You mentally map that failure back to your code.
- You switch back to JetBrains and try to fix it.
Each step is tiny, but collectively they:
- Break your focus every time you leave the editor
- Introduce a bunch of navigation friction (scrolling, clicking through jobs, finding the right run)
- Make it hard to juggle multiple branches or feature branches at once
If you lose even 1–2 minutes per CI cycle, and you’re pushing all day, that’s easily dozens of minutes per day lost just to tab juggling and UI hunting.
And that doesn’t count the mental overhead of constantly re-loading “where was I in this code again?”
What an Ideal JetBrains + GitHub Actions Workflow Looks Like
Before talking tools, it helps to describe the goal.
Here’s the workflow I wanted:
- CI status lives in a panel in my IDE, not in a browser tab
- For whatever project I’m working on, I can:
- See the latest workflow runs for that repo at a glance
- Filter by branch, workflow, and status
- Open logs and search them without leaving JetBrains
- Trigger reruns for jobs or workflows as needed
- Jump straight from a log entry to the relevant file and line in my project — for example, clicking on a failing test in the log opens that test in the editor
In other words:
GitHub Actions behaves like an IDE tool window rather than a separate website.
I still want GitHub’s UI for admin tasks, but for the daily loop of “write code → push → see if CI is happy → fix if not,” I want to stay inside JetBrains.
Existing Workarounds (and Why They Still Feel Clunky)
Before building anything, I tried all the common tricks:
-
Email or Slack notifications for failed runs
Helpful to know something broke, but you still end up clicking a link and getting dragged back into the browser. -
Pinned GitHub tabs
One tab per repo with the Actions page open. Better than searching from scratch, but you’re still leaving the IDE and spending time navigating runs and logs. -
Mobile/GitHub apps
Nice for quick checks, but not a natural fit when you’re actively coding on your laptop.
These all share the same flaw: CI is still somewhere else.
Your thinking is split between “coding mode” (JetBrains) and “CI admin mode” (browser/app). That’s exactly the split I wanted to remove.
Bringing GitHub Actions Into JetBrains
At this point I decided to flip the model:
Instead of “go to CI,” let CI “come to the editor.”
That’s what Actionate does.
Actionate is a JetBrains plugin that:
- Detects the GitHub repository associated with your project
- Connects to GitHub Actions and shows workflows and runs in an IDE tool window
- Lets you drill into logs, rerun jobs, and keep CI feedback next to your code
- Provides smart log navigation so you can jump to the start/end of logs or directly to errors, warnings, and notices
- Lets you open files and jump straight to code locations referenced in logs (e.g., failing tests or stack traces)
- Speeds up workflow authoring with smart, context-aware autocomplete for environments, configuration variables, and secrets in your workflow YAML
The rest of this post will walk through what using that looks like in practice, and how to set it up if you want to try it.
Setting Things Up
Prerequisites
You’ll need:
- A JetBrains IDE (IntelliJ IDEA, WebStorm, PyCharm, etc.)
- A project hosted on GitHub with at least one workflow configured (
.github/workflows/*.yml)
Install Actionate in JetBrains
- Open your IDE.
- Go to Settings / Preferences → Plugins → Marketplace.
- Search for “Actionate”.
- Click Install, then restart the IDE when prompted.
After the restart, you should see an Actionate tool window.
Connect to Your Repo & GitHub
Actionate uses your local git configuration to figure out which GitHub repository it should talk to.
For GitHub access, you’ll authenticate the same way you would for other tools:
- Using your usual GitHub login / token in JetBrains
- Actionate uses the GitHub API to fetch workflows, runs, and logs
From your perspective, once it’s installed and your project is open, you just:
- Open the Actionate tool window
- It shows the workflows and runs for the current repo
No extra wiring required.

Your New Daily Workflow: CI Inside JetBrains
This is where it gets fun. Let’s walk through what a normal day looks like with CI living inside your editor.
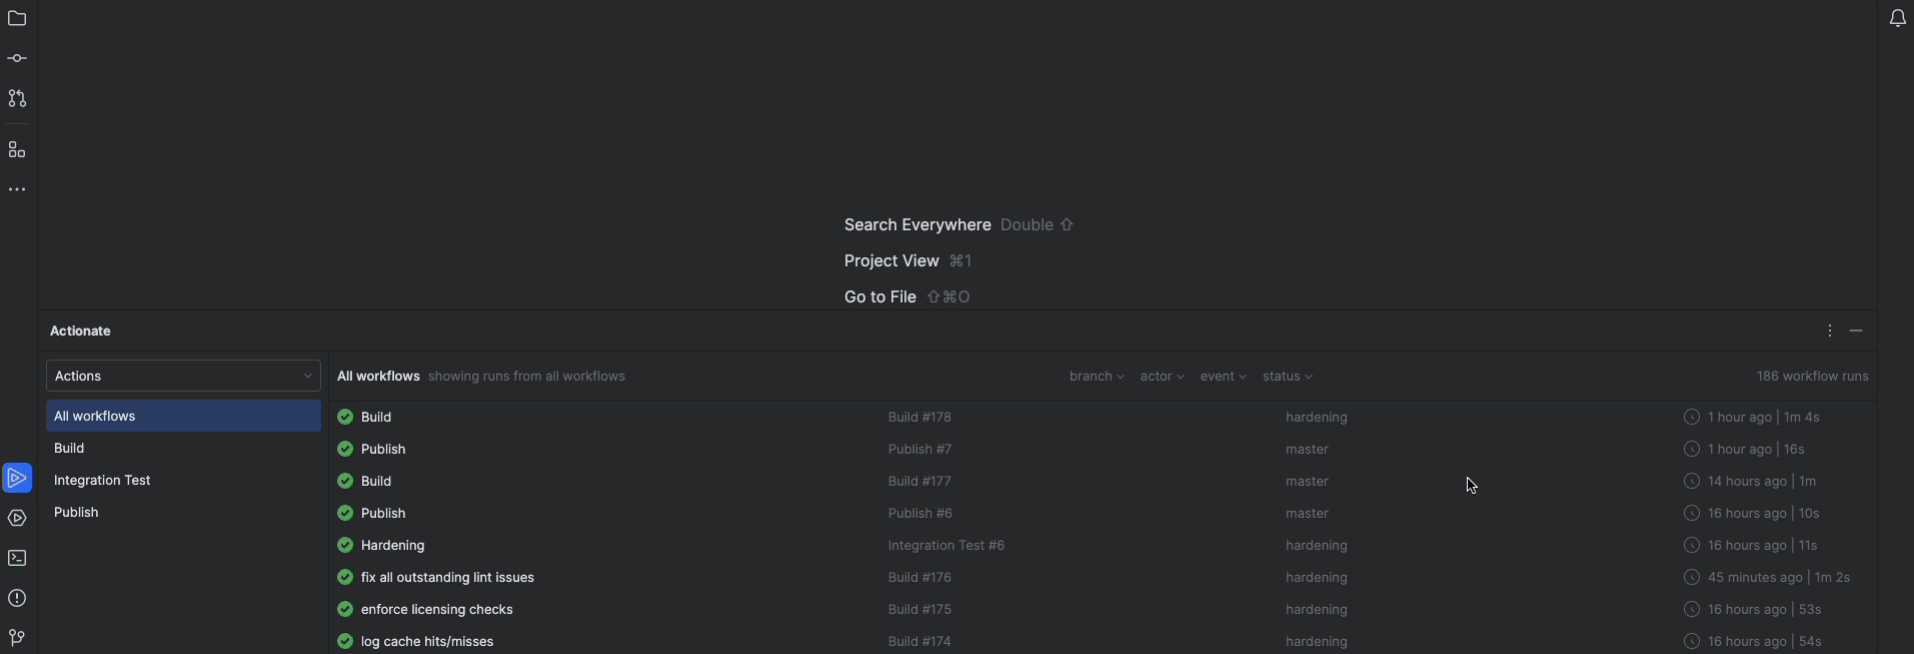
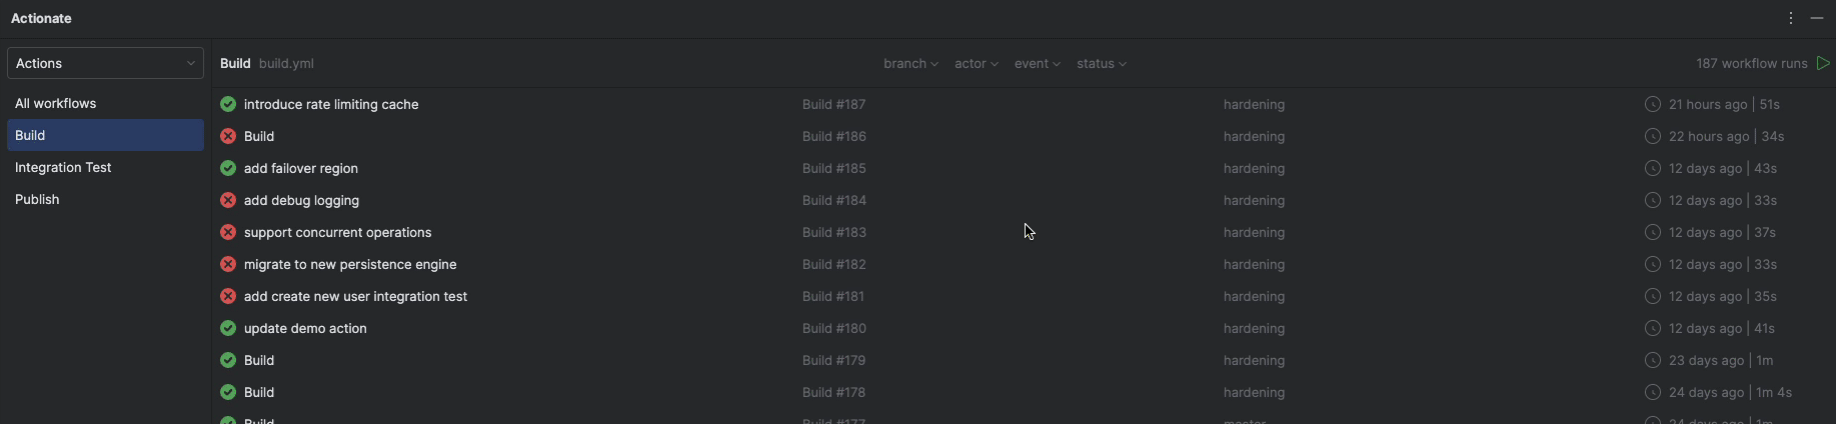
1. Glancing at Workflow Runs for Your Current Project
Instead of Cmd/Alt+Tabbing to GitHub, you:
- Open the Actionate tool window in JetBrains
- You’ll see a list of workflows and recent runs for the repo you’re working in
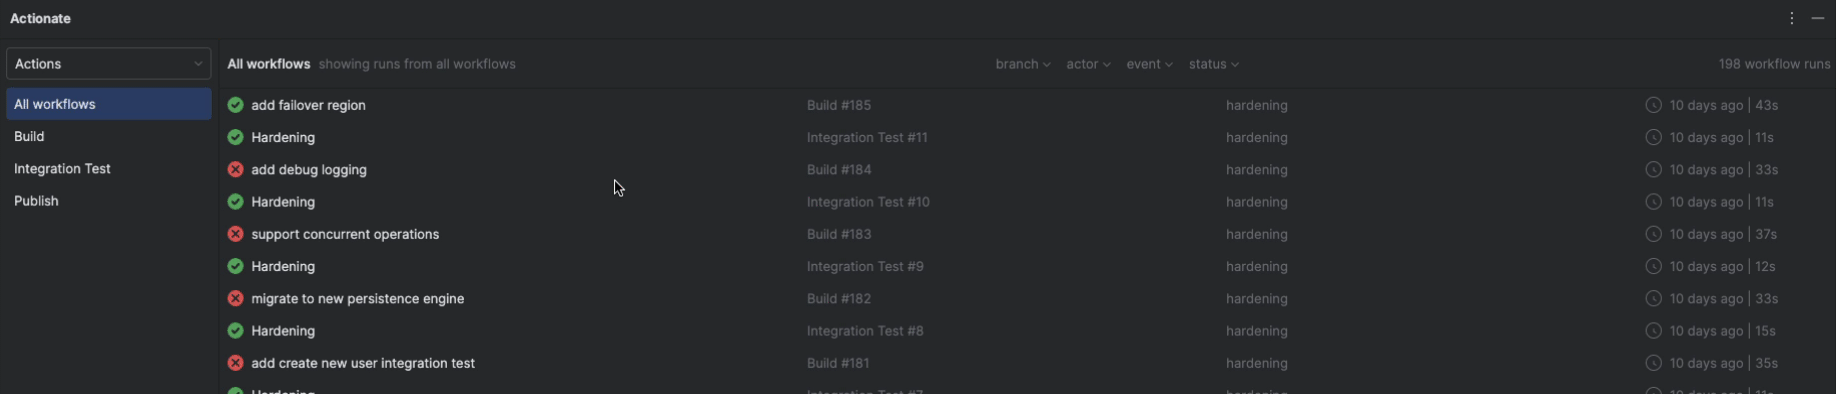
You can:
- See status at a glance (success, failure, in progress, queued)
- See branch, event (push, pull_request, etc.), and time
- Filter by workflow, branch, actor, event, and status if you only care about a subset
So after you push a commit, you:
- Keep coding or reviewing
- Occasionally glance at the Actionate panel to see if your CI run has started or finished
No context switch, no browser.
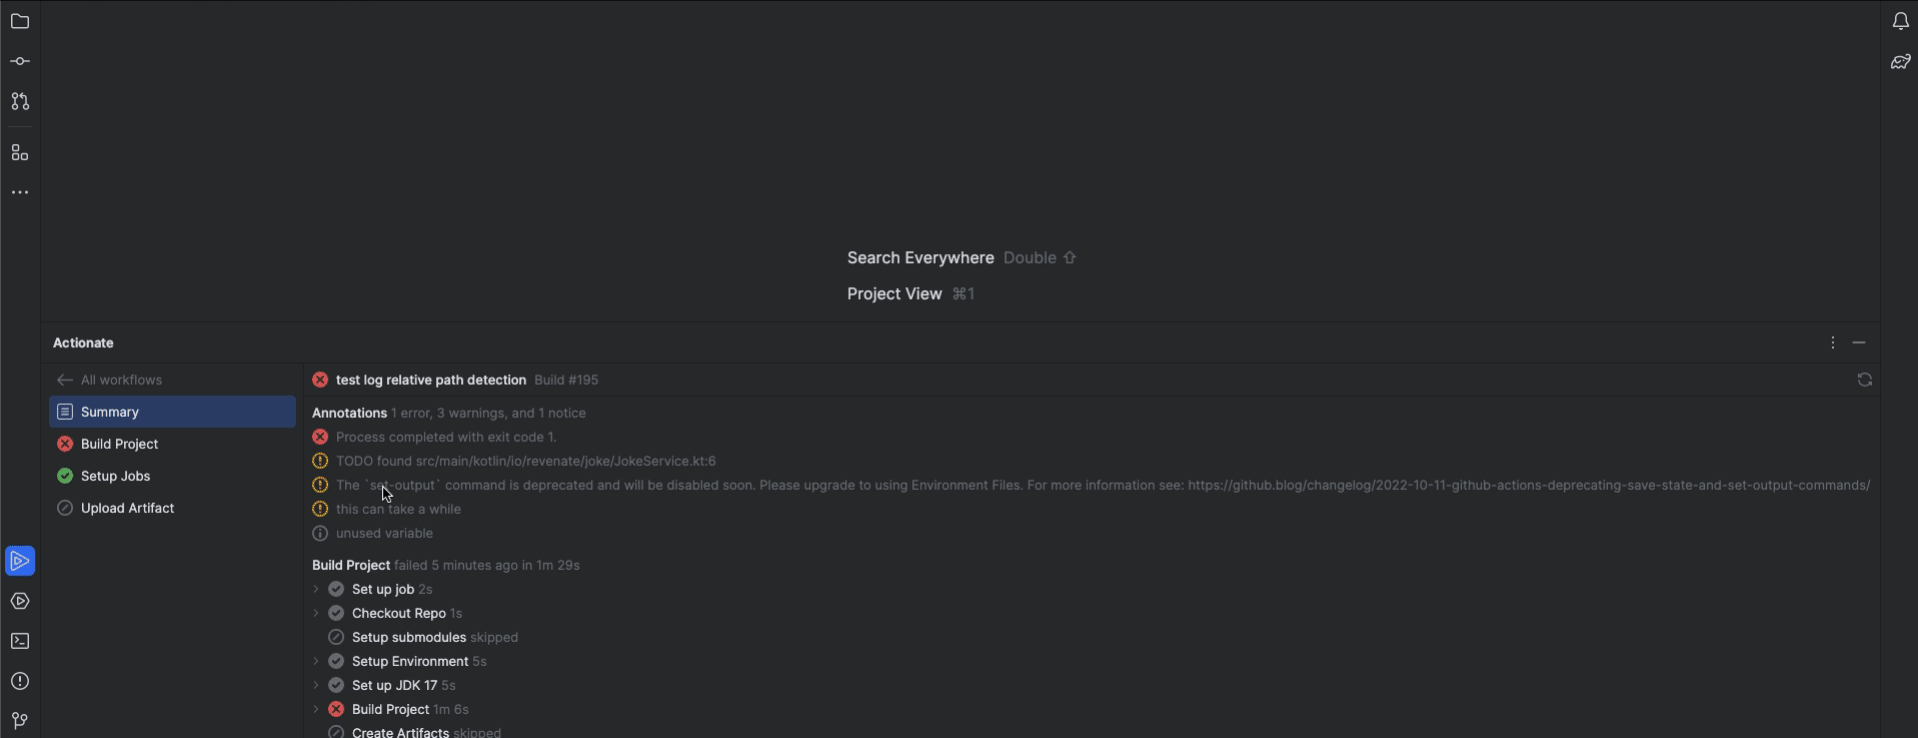
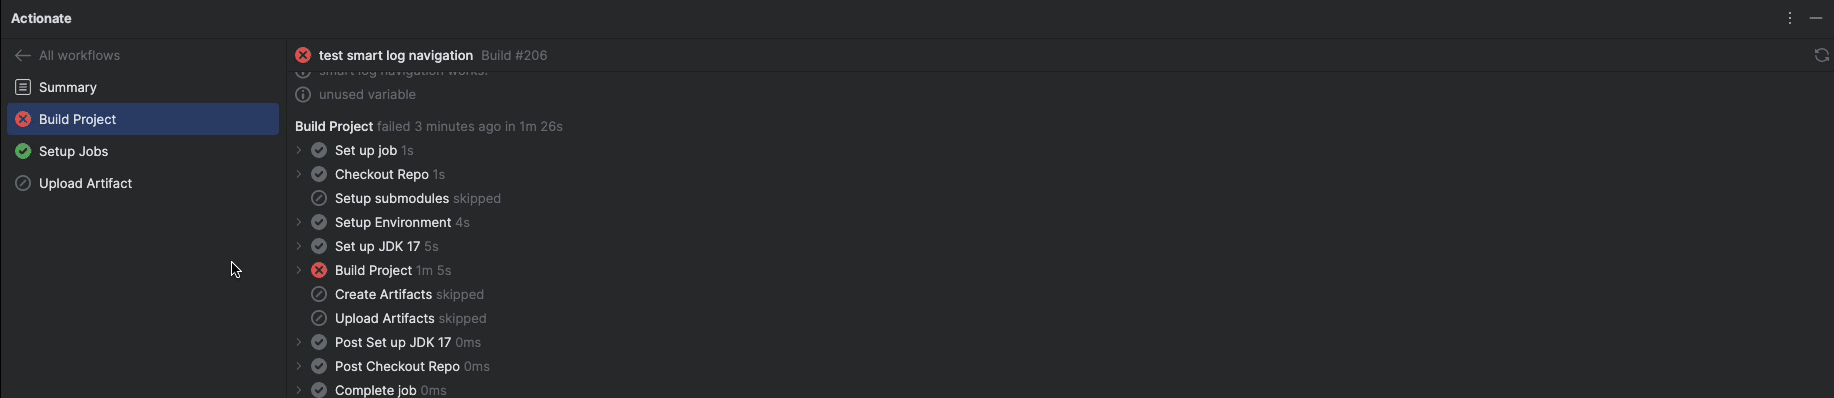
2. Inspecting Workflow Runs Without Leaving the Editor
When a run fails, the real time sink is usually digging through the workflow details and logs.
With CI in the browser, you:
- Click the run → click the job → scroll logs
- Maybe use browser search
- Try not to lose your place when clicking between steps
- Hit GitHub’s log size limit and see “This step has been truncated due to its large size…”
With Actionate in your IDE, you instead:
- Click the run in the Actionate panel
- Select the job you care about
- View the full workflow run details in a view docked inside JetBrains

From there you can view comprehensive workflow run details directly in the IDE, including:
- Run metadata: overall status, triggering event and actor, duration, associated pull request, commit, branch, and the workflow file used.
- Annotations: see run-level and job-level annotations right in the IDE, and use automatically detected links to open any referenced URLs in your browser with a single click.
- Artifacts: see all artifacts produced by a run, with the option to download and open each one directly from your IDE.
- Jobs: view every job in a run and its status at a glance, so you can instantly spot what failed and what succeeded.
- Steps: inspect every step in a job and its status, making it easy to track progress and pinpoint where things went wrong.
- Logs:
- View logs of any size without truncation or size limits—no “this step has been truncated” messages, no downloads.
- Use collapsible log groups and color-coded notices, warnings, and errors for quick visual scanning.
- Rely on smart log navigation to jump straight to the beginning or end of the log, or directly to the next notice, warning, or error.
- Take advantage of automatic link detection that turns external URLs and project file references into clickable links, so you can open them in your browser or jump straight to the referenced file and line in your IDE.
- Right-click any line to copy its text, copy a shareable link, or open that line in the browser.
- Run attempts – view all attempts for a run, making it easy to compare multiple executions and track how things change over time.
Because all of this lives inside your IDE, troubleshooting a run feels like working with your local test output and code side by side—not like bouncing to a separate website to wrestle with logs.
3. Fixing Code with CI Context Right There
The real win is in how quickly you can loop:
- See CI fail → inspect logs → adjust code → push again
With the logs right next to your code, you don’t have to:
- Remember exact error messages while flipping back and forth
- Juggle multiple windows on a small screen
- Lose your editor layout just to look at CI
You can:
- Keep the Actionate window and your editor visible at the same time
- Navigate between files while keeping the log pinned as a reference
- Copy/paste stack traces or commands directly from logs into your code or terminal
- Open project files and locations referenced in the logs (like failing tests or stack trace lines) directly in the IDE, so you’re editing exactly where the failure occurred
- Use smart log navigation to jump straight to the beginning or end of the log, or directly to the next notice, warning, or error
You stay in “coding mode” the whole time.
4. Rerunning Jobs & Workflows Quickly
When CI fails due to:
- Flaky tests
- Infra blips
- Temporary external service issues
…you often just want to rerun the same job or workflow.
Instead of:
- Hunting down the right run in the GitHub UI
- Clicking through a few menus to find the “rerun” button
You can rerun directly from the IDE

This becomes muscle memory. You’re not “going somewhere else to fix CI” — you’re just working in your editor and telling CI “try again.”
5. Manually Running Workflows On-Demand
Sometimes you don’t want to wait for a push or pull request event—you just want to run a workflow now with specific inputs.
With Actionate, you can manually trigger any workflow that uses the workflow_dispatch event, directly from your JetBrains IDE:
Here’s what that looks like in practice:
-
Trigger any dispatch-ready workflow
If a workflow defines theworkflow_dispatchevent, you can run it on demand from inside the IDE. -
Ref picker
Choose exactly which branch or tag you want to run the workflow from, so you’re always testing the right revision. -
Full input parameter support
Actionate discovers all inputs defined for the selected ref and lets you populate them inline, with full support for every parameter type and respect for default values set in your workflow file. -
Input validation
Required parameters must be filled in before you can trigger the workflow, so you don’t accidentally kick off runs missing critical inputs.
Being able to manually run workflows like this—without leaving your editor, and with guardrails around inputs—makes ad-hoc tasks, release flows, and one-off maintenance jobs much smoother.
6. Authoring Workflows Faster, with Fewer Errors
Running workflows inside your IDE is great—but you still have to write and maintain those workflows.
Without Actionate, authoring GitHub Actions YAML usually means:
- Flipping between your editor and multiple pages in the GitHub UI
- Hunting down environment names, config variables, and secrets in repo/org settings
- Copy-pasting long names and hoping you don’t fat-finger anything
- Re-checking which value “wins” when you have environment, repo, and org-level overrides
It’s tedious, interrupting, and surprisingly easy to get wrong.
With Actionate, you get intelligent autocomplete for workflows directly in your JetBrains IDE, so the information comes to you instead.
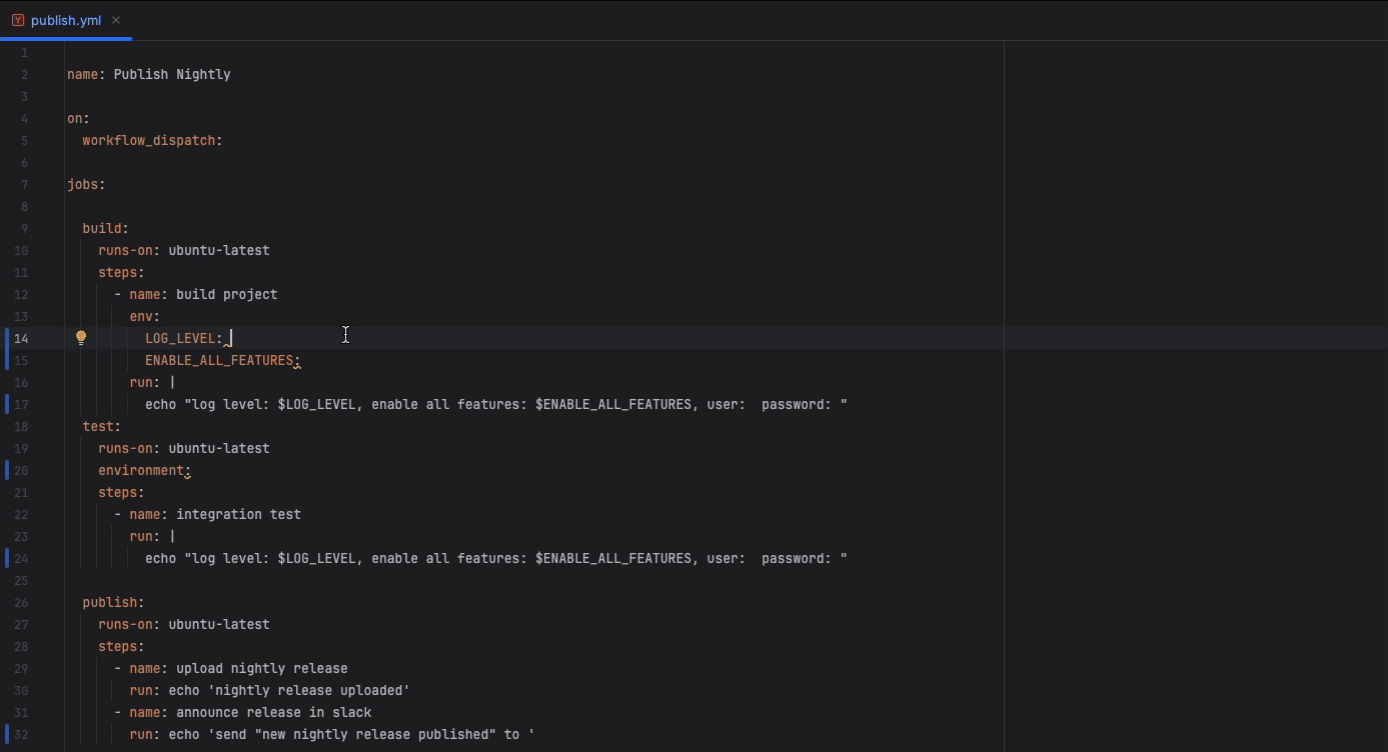
Here’s what that looks like:
-
Environment autocomplete
Quickly insert GitHub Actions environments defined in your repository—no more memorizing names or digging through settings pages. -
Configuration variables autocomplete
Get suggestions for config variables as you type, with the correct precedence automatically applied: environment → repository → organization.
Each suggestion clearly shows its source, so you always know where a value is coming from. -
Secrets autocomplete
Effortlessly include repository secrets with intelligent suggestions that respect overrides across environments, repo, and org.
Suggestions show exactly where each secret is defined, so you never have to guess. -
Context-aware overrides
Actionate looks at your current job context and, if the job specifies an environment, dynamically applies environment-level overrides so suggestions are always accurate for the code you’re editing. -
Inline, contextual suggestions
Autocomplete appears right where you’re editing your workflow files, keeping you in the flow and dramatically cutting down on typos, missing inputs, and copy-paste mistakes.
The end result: authoring and updating workflows goes from a brittle, multi-tab chore to a smooth inline experience inside JetBrains—less fat-fingering, less hunting, and a lot more velocity.
Advanced Usage: Power-User Workflows
Once you get the basics down, a few patterns make this even more powerful.
Working with Monorepos / Multi-Module Projects
If you have:
- A monorepo with many workflows
- Multiple services sharing a repo
- Several CI pipelines firing on each push
The Actions UI can get noisy fast.
Inside your IDE, you can:
- Filter runs by workflow name to only see the pipeline for the service you’re touching
- Focus on runs for your current branch, or specific actor so you don’t get lost in activity from the rest of the team
The net effect is that your CI view feels project-specific, not “the whole company’s CI firehose.”
Debugging Flaky Tests & Slow Builds
When you’re chasing flaky tests or slow steps:
- Having logs right there in the IDE makes it easier to spot patterns
- You can run a test locally, see it pass, then immediately flick to the CI logs inside Actionate when it fails remotely
A few habits that help:
- Use your IDE’s search alongside the CI logs (e.g., search for an error message across the codebase while looking at that error in the logs)
- Keep the Actionate panel open during flakiness investigations, so you can quickly bounce between different runs
Security, Permissions, and Performance
Whenever you connect tools to CI, it’s natural to ask: “Is this safe? Is it slow?”
A few quick points:
-
Actions still run on GitHub
Actionate doesn’t run workflows locally; it talks to GitHub’s API to list and manage runs. The plugin is a client, not a runner. -
It respects your GitHub permissions
If you can’t see or rerun a workflow in GitHub normally, you won’t suddenly gain that power in the IDE. -
Performance considerations
The plugin only pulls the data it needs (lists of runs, logs for specific runs you open, etc.). You’re not downloading your entire Actions history all at once.
In practice this feels similar to the GitHub UI, just inside JetBrains.
What Changed in My Own Day-to-Day
The contrast before vs after is pretty stark.
Before:
- Constantly juggling browser tabs
- Losing my place in the code after digging through CI logs
- CI felt like a separate phase of work
After:
- I treat CI as just another panel in my editor, like the terminal or version control
- If something fails, I fix it while the failure is still in front of me
- I spend far less time “navigating UIs” and more time fixing or improving code
Subjectively, it feels like the feedback loop tightened even though the raw CI runtime didn’t change. The delay from “CI finished” to “I understand what happened and I’m working on the fix” shrinks dramatically.
How to Try This Setup Yourself
If you want to see how this feels in your own projects, here’s the simple path:
- Install Actionate from the JetBrains Marketplace
- Open a project that lives on GitHub and uses GitHub Actions
- Open the Actionate tool window in your IDE sidebar
- Push a change or trigger a workflow
- Watch the run and inspect logs without leaving JetBrains
From there, try:
- Keeping the Actions panel open while you work
- Handling a real CI failure entirely inside the IDE
- Rerunning a job or workflow from the editor instead of the browser
If it clicks, you’ll probably find you never want to go back to living in the Actions tab.
Closing Thoughts
CI is part of your everyday development loop. It shouldn’t live in a disconnected browser tab you only visit when things break.
Bringing GitHub Actions into JetBrains:
- Reduces context switching
- Keeps failures and logs where you’re already thinking deeply about code
- Makes “fixing CI” feel like a natural extension of “writing code,” not a separate chore
If you try this out with Actionate and have feedback — what works well, what’s confusing, what’s missing — I’d genuinely love to hear it. This whole approach came from scratching my own itch, and it gets better every time someone else kicks the tires and tells me how CI fits into their workflow.